Manage custom unit presets
This topic only applies to version 16.5 Update 33 and later.
For earlier versions see Create custom units.
When tenant data are upgraded from an earlier version to a version that uses presets, the existing custom unit definitions, applied to individual variables, are converted to presets with names in the form 'CustomUnit_{NNN}'. The presets can be renamed.
Custom units are defined as 'presets', and managed with the Custom Unit Manager. Presets can be created in the Manager and then can be applied to variables from the units selector in the variables editor tools. Hence identical custom unit settings can be applied to multiple variables.
Important: Preset contents cannot be changed after the initial creation, and presets cannot be deleted. However, preset names can be changed.
When Units are selected for a variable the list of available units contains all of the system units and custom unit presets combined and ordered alphanumerically. There is no marker to identify which of the list are custom unit presets.
Apply a custom unit preset to a variable
See Custom units of measurement.
Open the Custom Unit Manager
Click the Manage (Custom Units) button on the ribbon to open the Custom Unit Manager dialog.
Use the Name selector to view the unit definitions for existing presets.
Add a new preset
Click the Add new custom unit
button  which
is next to the Name selector. Enter a new preset name in the dialog; names are validated while you are typing.
Click OK and you will see a unit definition with editable fields.
which
is next to the Name selector. Enter a new preset name in the dialog; names are validated while you are typing.
Click OK and you will see a unit definition with editable fields.
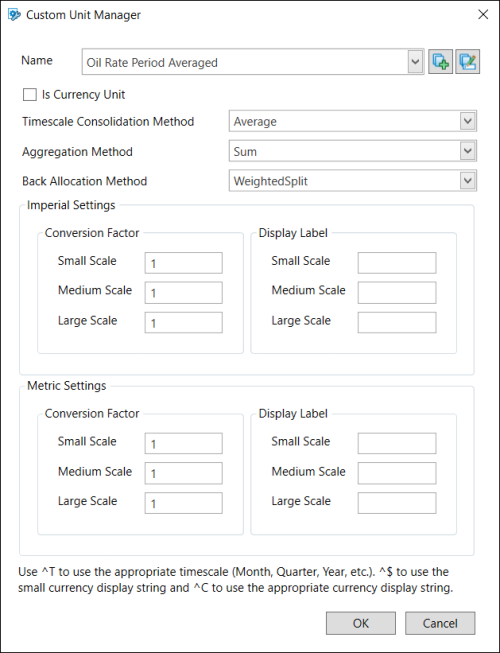
Currency Unit setting
Use the Is Currency Unit check box to specify whether the new unit is a currency-type unit.
Methods settings
Select a timescale consolidation method. For information about the available options see Timescale consolidation methods.
Select an aggregation method. The available methods are: Sum, Maximum, Minimum, Average, WeightedAverage, NonzeroAverage.
Select a back-allocation method. The available methods are: NoSplit, EvenSplit and WeightedSplit.
Imperial settings
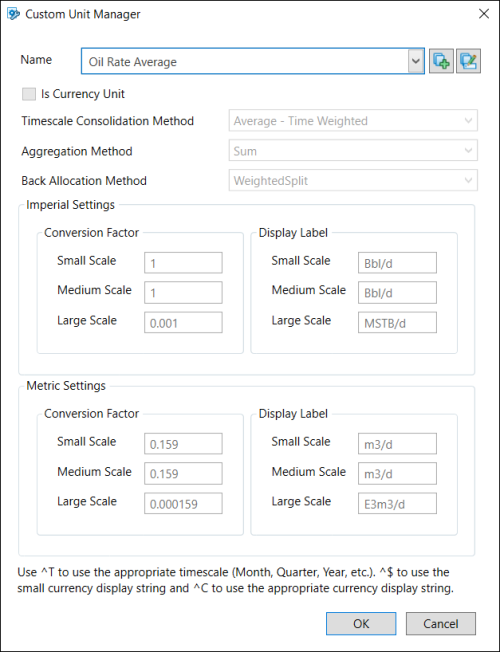
In the Imperial Settings section, specify factors for conversion between unit scales. The screenshot below shows an example. Since the Medium scale is the base, 1 is set as the medium-scale conversion factor. One unit on the Medium scale contains 1000 individual units, thus the small-scale conversion factor is 1000. And one unit on the Large scale contains 1000 units on the Medium scale, thus the large-scale conversion factor is 0.001.

The Display Label section contains labels for the unit at different scales. Planning Space system units use the convention of 'M' for thousand and 'MM' for million.
Note: There is a limit of 15 characters for the label strings. (This can be overridden if the variables configuration is directly edited in the database, however the UI editor will truncate any labels longer than 15 characters.)
Metric settings
In the Metric Settings section, you specify the factors for conversion between the Imperial and Metric systems. The screenshot below shows an example of oil volume conversion. One barrel is 0.1589873 m3, thus the conversion factor for the Medium scale, from 1000 barrels to 1000 m3, is 0.1589873. This conversion factor must be multiplied by small- and large-scale factors (1000 and 0.001), which gives conversion factors of 158.9873 and 0.0001589873.
Finally, the Metric labels for the unit are inserted as: m3, E3m3 and E6m3.

Save the new preset
Click OK to save the new preset.
Preset contents cannot be changed after this point so check carefully that your settings are correct.
Rename a preset
To rename a preset, select it in the Name selector, then click the Rename
button  which
is next to the Name selector, and
edit the name in the Rename Custom Unit Preset dialog; names are validated while you are typing.
which
is next to the Name selector, and
edit the name in the Rename Custom Unit Preset dialog; names are validated while you are typing.
Click OK to close that dialog, then click OK in the Custom Unit Manager dialog to save the name change.